CGKB News and events Other crops
Regeneration guidelines for lentil
|
View regeneration guidelines in full (in PDF) Also available in the following languages: |
The information on this page was extracted from:
Street K., Rukhkyan N. and Ismail A. 2008. Regeneration guidelines: lentil. In: Dulloo M.E., Thormann I., Jorge M.A. and Hanson J., editors. Crop specific regeneration guidelines [CD-ROM]. CGIAR System-wide Genetic Resource Programme, Rome, Italy. 9 pp.
Before reading the regeneration details for this crop, read the general introduction that gives general guidelines to follow by clicking here.
Introduction
Lentil (Lens culinaris Medik.) is a legume that has been grown in the Mediterranean region since ancient times. The Fertile Crescent or west Asia is recognized as the centre of its domestication and diversity, where it is still an important winter-sown crop. It has now spread throughout Eurasia where it is grown mostly in the southern latitudes on calcareous soil types. The lentil plant is a dwarf (20–50 cm), bushy annual with weakly upright to semi-vine growth, with similar appearance to the vetch plant. Lentil has a restricted root system, tending to lodge at maturity because of its weak stem. It has many soft, hairy branches with pinnately compound leaves and numerous oval leaflets. Flowers are white, lilac or pale blue. The broad, smooth pods range from 8 to 40 mm long and 6 to 15 mm wide. Each pod bears 1–2 seeds which are thin and lens-shaped; colour ranges from brown to yellow to various mottled patterns. The weight of 100 seeds ranges from 1.5 to 8.0 g.
The genus Lens belongs to the Fabaceae family and includes the cultivated L. culinaris Medik. subsp. culinaris and wild subspecies L. culinaris subsp. orientalis (Boiss.) Ponert, the progenitor L. culinaris subsp. tomentosus Ladiz. and L. culinaris subsp. odemensis Ladiz., along with three wild species. The taxa within culinaris are in the primary gene pool, while L. ervoides (Brign.) Grande, L. nigricans (Bieb.) Godr. and L. lamottei Czefr. are in the secondary– tertiary gene pool. The taxonomy of Lens, however, remains in debate. All Lens species are self-pollinating annual diploids (2n=14). Two main groups of domesticated lentils are recognized on the basis of seed size: i) microsperma and ii) macrosperma.
This guideline applies to genebank accessions of lentil including breeding material, pure lines, landrace populations and populations of wild relatives.
Cultivated lentil (Lens culinaris)
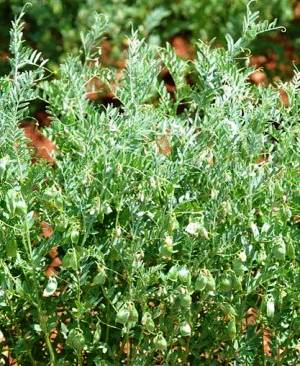 Lentil plant. (photo: ICARDA) |
Choice of environment and planting season
Climatic conditions
- Lentil requires low to medium rainfall (300–450 mm) with a stable dry period in spring to ensure ripening. It is moderately resistant to heat and drought.
Planting season
- Regenerate plants during the rainy season. In Mediterranean-type environments, this coincides with winter. Sow after the first substantial rainfall event of the season and when there is a high likelihood of following rains.
- In environments where the rainy season coincides with warm, humid weather, plant during the post-rainy season, when temperatures are cool and humidity is lower, to reduce pest and disease pressure. In India, this is during October. The short days of the post-rainy season also induce flowering in photosensitive germplasm accessions, enabling their seed production.
- Spring sowing is usual for northern Europe and America. Sow from late April to mid May.
Preparation for regeneration
When to regenerate
- When seed stocks are <1000 seeds.
- When germination drops below 90%.
- When seed demand is high.
Preparing seed for planting
1. After receiving accessions from the genebank, divide the seeds of each accession into four subsets of 200 seeds each. Each subset wil be planted in a 4-m-long row.
2. Prepare a packet for each subset of seed and write the genebank accession number on it.
3. Treat seeds with appropriate fungicide and insecticide.
4. Place each subset of seed in a labeled packet with the original genebank-labeled packet on top and additional packets underneath. Staple the packets together.
Field selection and preparation
- Soil should have good drainage and be free from weeds at the time of sowing to ensure a good reserve of soil moisture.
- Fusarium wilt is a major limitation to crop growth during regeneration of lentil. Control it through solarization of soil and field rotation, e.g. cereals–legumes–fallow.
- Where possible use heavy, alluvial, normal soils with a pH of 7.5.
- Deep plough to invert soil and follow with two or three harrowings to produce a fine tilth and an even flat seedbed.
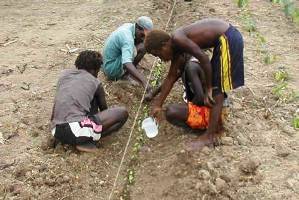
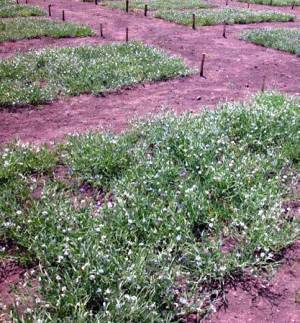 Planting layout for lentil regeneration. (photo: ICARDA)
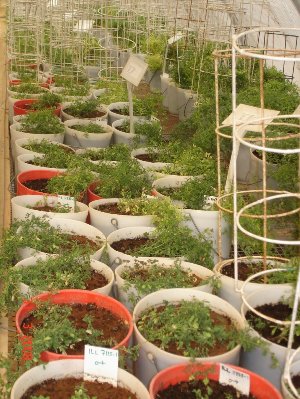
Rescue regeneration of lentil using pots. (photo: ICARDA) |
Method of regeneration
Planting layout, density and distance
- For accessions that are populations of genetically diverse material, such as landraces, use a total of 800 seeds planted in four rows (200 seeds per row), 4m long.
- For pure lines that are genetically fixed, such as advanced breeding material, plant adequate amounts to recover the amount of seed required (at least 300g or 8000–12 000 seeds.
- Leave at least 45 cm between rows to allow adequate space for inter-row cultivation (see photo).
- Leave 90 cm as isolation between plots.
Sowing method
- If using a machine designed for small research plot applications, plant directly into a flat seedbed at a depth of 3 cm.
- Dibble one seed every 2.5–3 cm.
- Ensure the planter is free of residual seeds when moving onto the next accession.
- If planting by hand, open furrows to about 3 cm depth and place seeds so they are 3 cm apart; close furrows once completed.
Labelling
- Label each plot with a plot number and the accession’s unique identifying number (e.g., ICARDA uses the IG number) written onto a plastic tag fastened to a stake about knee high. Use plastic labels and markers that can withstand weathering.
Crop management
Weed management
- Directly after planting apply a pre-emergence herbicide mixture that targets both cereal and broadleaf weeds, e.g. ICARDA uses a mixture of Propyzamide and Terbutryn.
- Cultivate between rows twice during early stages of plant growth using a mechanical cultivator, if available.
- Weed by hand at later stages if required.
- Eliminate off-types and plants growing outside the row by hand.
Fertilization
- Apply a basal dose of diammonium phosphate at 100 kg/ha.
Irrigation
- Irrigate the field directly after sowing for dry sowings. Irrigate pre-sowing to ensure excellent germination.
- Apply supplementary irrigation as necessary to ensure adequate seed yield. Plants should not become so water-stressed that flower or pod abortion occurs or pod-filling is impeded.
Common pests and diseases
Contact plant health experts to identify symptoms of the likely pests and diseases and the appropriate control measures. Common pests and diseases for lentils include:
Insects
- Green stink bug [Nezara viridula (L.), Taylorilygus pallidulus (Blanch)]
- Aphids: cowpea aphid [Aphis craccivora (Koch)], pea aphid [Acyrthosiphon pisum (Harris)]
- Leaf weevils (Sitona spp.)
- Apion spp.
- Bruchid spp.
- Maggots of Agromyzidae
- Leaf midges
- Legume-pod moth or limabean pod borer [Etiella zinckenella (Treit.)]
- Noctuid insect pests: lesser armyworm [Spodoptera exigua (Hb.)], Egyptian cotton leafworm [S. littoralis (Boisd.)], greasy or black cutworm [Agrotis ipsilon (Hfn.)], winter cutworm [A. segetum (Denis and Schiff.)], silvery moth [Autographa gamma (L.)], watermelon or cabbage looper [Trichoplusia ni (HB)].
Diseases
- Vascular wilt (soil-borne disease but the pathogen has also been found in association with Fusarium spp.)
- Collar rot (Corticium rolfsii)
- Root rot and stem rot (blight) (Sclerotinia sclerotiorum) Botrytis cinerea is the conidial stage
- Rust (Uromyces fabae)
- Powdery mildew (Erysiphe polygoni)
- Downy mildew (Peronospora lentis)
- Cercospora leaf spot (Cercospora zonata)
- Ascochyta leaf blight (Ascocytha lentis)
- Alternaria blight (Alternaria tenuis)
- Anthracnose (Colletotrichum trifolii)
- Nematode disease: root-knot nematode
- Bacterial disease: root rot.
Pest and disease control
- Coordinate periodic field inspections with pathologists and virologists during the growing season.
- Spray with appropriate chemicals when necessary.
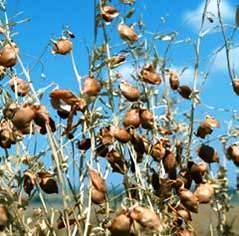 Lentil ready for harvest. (photo: ICARDA) |
Pollination and pollinator behaviour
- Coordinate periodic field inspections with entomologists during the growing season to identify the most efficient visitor/pollinator and determine relationship of pollinator versus flower morphology.
- Evaluate the accessions for additional phenological and floral morphological traits.
Harvesting
- Harvest when pods are dry (see photo). Dryness is indicated by a rattling sound when pods are shaken. Older leaves become yellow and drop, indicating maturity. Harvesting can be done either by hand (particularly if plant is too tall or has lodged) or by a machine designed for experimental plots. Place harvested seed in a cloth bag along with the plot tag and fix another tag on the outside of the bag.
- Apply a desiccant for improved harvestability, to even out ripening in a paddock, ripen late pods, kill green weeds and allow earlier harvesting. The best time for desiccation is when the crop first starts to yellow. The crop will be ready to harvest 5–10 days after the application of the desiccant, depending on the weather.
- Meticulously clean the harvester after harvesting each accession.
Post-harvest management
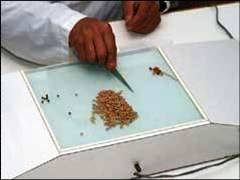
After mechanical cleaning, seeds are further cleaned by hand to remove any remaining debris. Seeds are inspected with the naked eye or under a binocular microscope for mechanical damage and empty seeds. (photo: ICARDA) |
1. Clean seeds of debris using a seed cleaning machine (mechanical sieve type) directly after harvest in a way that causes least damage to the sample. Alternatively, hand-clean or sort with appropriate sieves.
2. Meticulously clean seed cleaner between each accession.
3. Clean seeds of remaining debris by hand (see photo).
4. If signs of insect attack are detected, fumigate the harvested seeds with an appropriate insecticide. This is, however, not general y recommended, especial y for long-term storage.
5. Determine total weight of cleaned seeds.
6. Determine 100-seed weight (ranges from 1.5 to 8.0 g).
7. Dry accessions by placing seed in low humidity, room temperature environment for up to 3 weeks. If using a control ed seed drying room, dry at 15°C and 15% RH. If a drying room is not available, dry seeds to a moisture content of 3–7% with silica gel or another appropriate desiccant.
8. Determine moisture content—it should be 3–7% for storage.
9. Send a subsample of each accession for viability testing.
10. Process the material for storage.
Monitoring accession identity
Maintaining the correct identity of accessions
Throughout the process of regeneration from seed preparation to post harvest, take extreme care to ensure that the seeds for a given accession remain with the correct identity number. Always label packets of seeds, plots and harvested material with the appropriate ID number in such a way that there can be no chance of mixing up or losing the identity of the accession.
Maintaining population integrity
When conserving accessions of genetically diverse populations, it is important to maintain adequate amount of seed to maximize the diversity of the sample (minimum 1000 seeds). When regenerating such accessions, it is equally important to plant an adequate amount of seed to capture the original variation in the population so that genetic drift does not occur within the population (see introductory chapter).
Comparisons with previous passport or morphological data
Compare each accession with the following characterization data previously recorded for the accession:
- Growth habit
- Flower colour
- Seed colour
- Seed shape
If the identity of the accession is in doubt, check it against its herbarium voucher specimen. Discard the accession if its identity is not the same as the original accession.
Wild lentil
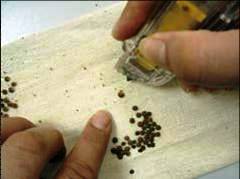 Scarifying seeds by making a small cut in the seed coat to improve water absorption and germination. (photo: ICARDA) |
Species
Lens ervoides (Brign.) Grande, L. lamottei Czefr., L. nigricans (M. Bieb.) Godr, L. culinaris subsp. orientalis (Boiss.) Ponert, L. culinaris subsp. tomentosus Ladiz., L. culinaris subsp. odemensis Ladiz.
Planting and growth conditions
Grow accessions in plastic pots under greenhouse conditions using the following procedure:
1. Fil smal pots (earthen or plastic pots, 30 cm diameter x 30 cm deep) with an autoclaved mixture of 3:1 soil and sand.
2. Scarify the seeds by making a smal cut in the seed coat to improve water absorption and germination (see photo).
3. Dress the seeds with fungicides and insecticides.
4. Sow at least 50 seeds per accession, with two seeds per pot at a depth of 2 cm.
5. Water the pots immediately after sowing and then every 5–6 days.
6. Starting from flowering, validate each accession against what is recorded in the database for the fol owing characters:
- Peduncle length
- Pedicle length
- Aristae length
- Pod pubescence
- Stipule shape
- Seed shape and colour at maturity
7. If the identity of the accession is in doubt, check it against its herbarium voucher specimen and discard it if it is not the same as the original accession.
8. At the beginning of seed maturity, cover each plant with a light mesh bag and tie it off at the base of the plant.
9. Once the plant is ful y matured, harvest the whole plant intact with the cloth bag.
10. Extract the seeds from the dry plant material.
11. Bulk seeds from single plants of the same accession.
12. Weigh the yield of seeds from each accession.
13. Determine 100-seed weight for each accession.
14. Dry seeds by placing them in a low humidity, room temperature environment for up to 3 weeks.
15. Determine moisture content—it should be 3–7% for storage.
16. Send a subsample of each accession for viability testing.
17. Process the material for storage.
Documentation of information during regeneration
Collect the following information during regeneration and record it in the genebank information system:
- Regeneration site name and map/GPS reference
- Name of scientist involved in regeneration
- Field/plot/nursery/greenhouse reference
- Accession number and population identification
- Source of seed
- Previous multiplication or regeneration references
- Preparation of planting materials (pre-treatments)
- Sowing date and density
- Field layout used
- Field management details (watering, fertilizer, weeding, pest and disease control, stresses recorded, others)
- Environmental conditions (altitude, precipitation, soil type, others)
- Emergence in the field or greenhouse (number of plants germinated)
- Number of plants established
- Days from sowing to flowering
- Harvest date and method
- Number of plants harvested
- Quantity of seeds (approximate weight)
- Agronomic evaluation; agro-morphological traits recorded
- Taxonomic identification
- Post harvest (uniformity of maturity, lodging susceptibility)
References and further reading
Barulina H. 1930. Lentils of the USSR and other countries. Bulletin of Applied Botany, Genetics and Plant Breeding 40(Suppl): 265–304.
Bioversity International, ICARDA, NBPGR. 2010. Key access and utilization descriptors for lentil genetic resources. Bioversity International, Rome, Italy; International Center for Agricultural Research in the Dry Areas, Syria; National Bureau of Plant Genetic Resources, India. Available here.
Ladizinsky G, Braun D, Goshen D, Muehlbauer FJ. 1984. The biological species of the genus Lens L. Botanical Gazette 145(2): 253–261.
Ladizinsky G. 1993. Wild lentils. Critical Reviews in Plant Sciences 12(3): 169–184.
Acknowledgements
These guidelines have been peer reviewed by María José Suso, Instituto de Agricultura Sostenible (CSIC), Spain; Margarita Vishnyakova, Department of Leguminous Crops, N.I. Vavilov Research Institute of Plant Industry (VIR), Russia; and S.S. Yadav, former Principal Legume Breeder, Division of Genetics, Indian Agricultural Research Institute, India.
Regeneration guidelines for major aroids
|
View regeneration guidelines in full (in PDF)
Also available in the following languages: |
The information on this page was extracted from:
Jackson G.V.H. 2008. Regeneration guidelines: major aroids. In: Dulloo M.E., Thormann I., Jorge M.A. and Hanson J., editors. Crop specific regeneration guidelines [CD-ROM]. CGIAR System-wide Genetic Resource Programme, Rome, Italy. 16 pp.
Before reading the regeneration details for this crop, read the general introduction that gives general guidelines to follow by clicking here.
Introduction
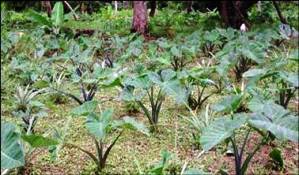
The major aroids comprise taro (Colocasia esculenta (L.) Schott), Xanthosoma species and swamp taro (Cyrtosperma merkusii (Hassk.) Schott), syn. C. chamissonis (Schott) Merr.). Taro Colocasia esculenta (L.) Schott (see photo below) is grown for its corm and leaves. It is an ancient crop from north-eastern India with multiple centres of domestication. A wild form, C. esculenta var. aquatilis Hassk., is the progenitor of the cultivars grown today, including those in the Pacific. It is an early introduction to Africa. Two botanical varieties have been recognized: var. esculenta (L.) Schott (dasheen) and var. antiquorum (Schott) Hubbard & Rehder (eddoe). Pan tropical dasheens have large central corms and suckers or stolons from which they are regenerated. Eddoes are more common at temperate latitudes and higher altitudes, with relatively small central corms and numerous cormels, but can also be propagated from suckers in tropical countries. Intermediate types also exist.
Xanthosoma (see photo below) is an important pan-tropical crop, with its centre of origin possibly in northern South America where some species were domesticated, probably from different wild forms. Xanthosoma is known to have been introduced to West Africa, Oceania and Asia. There are two main species, X. sagittifolium (L.) Schott and X. violaceum Schott, but the taxonomic position of the cultivated Xanthosoma species is unclear, and the name X. sagittifolium is often given to all cultivated forms. Xanthosoma is vegetatively propagated from corm setts, headsetts or cormels. Although flowers occur and seeds are viable, flowers are rare in most varieties and non-existent in some. In addition, seedlings may not breed true and hence are not recommended for regeneration.
Cyrtosperma merkusii (Hassk.) Schott (see photo below) is the only edible form of its genus. Unlike taro and Xanthosoma, the leaves are not eaten but they may be used as medicines and for making fine grade mats. Cyrtosperma is thought to have an Indo-Malay centre of origin, perhaps coastal New Guinea, Solomon Islands or West Melenesia. Wild-type plants are said to occur in the Solomon Islands. Cyrtosperma is vegetatively propagated from setts or suckers. Flowers and seed do occur but are not common and are not recommended for regeneration.
Genetic resources of aroids are conserved through vegetative propagation. It is good practice to establish a duplicate field collection as a back-up. Methods for cultivating and propagating aroids are not well documented but extensive local knowledge exists so consulting local practitioners for guidance is recommended when regenerating aroids.
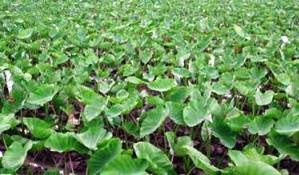
Taro (Colocasia esculenta) growing in Thailand. |
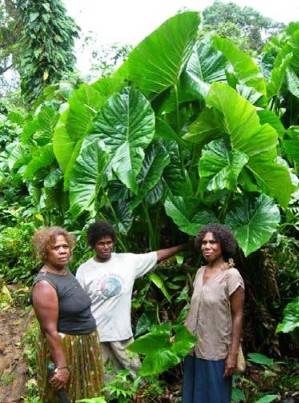
Swamp taro (Cyrtosperma merkusii) in Kiribati. |
Xanthosoma sp. in Tonga. |
Choice of environment and planting season
Climatic conditions
All three crops require moist soils and none of them tolerate drought.
Taro needs reliable rainfall throughout the growing season or irrigation, moist soils and maximum temperatures of around 25°C.
Xanthosoma grows in lowland and upland situations, with well-distributed rainfall, 1500–2000 mm annually, a mean temperature above 20°C, and freely draining soils of pH 5.5–6.5.
It tolerates light shade but grows well in the open.
Cyrtosperma is generally a hardy species. It tolerates shade and wind but whether it is salt tolerant, as often stated, is less certain.
Planting season
Taro
- If planting setts (lower part of the petiole with the top part of the corm), suckers or cormels in tropical latitudes and dryland conditions, plant at the onset of the rainy season.
- If planting suckers in wetland tropical conditions, plant at any time of the year, as long as water is available.
- If planting cormels in temperate latitudes, plant in spring or, if at high altitude, during the warmer, wetter time of the year.
Xanthosoma
- If water is available, either through irrigation or well-distributed rainfall, plant at any time of the year. There is no seasonality.
- Where rainfall is seasonal, plant when rains become reliable.
Cyrtosperma
- Although seasonal, the best time to plant is during very low tide, or when pits are not flooded, otherwise the young plants may be submerged and/or moved out of position.
Preparation for regeneration
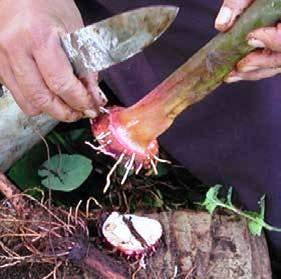 Preparing planting material of taro (Colocasia esculenta) by removing any remaining roots, Tonga. (photo: Grahame Jackson) |
When to regenerate
Taro
- Regenerate plants after a crop cycle of 5–15 months, depending on the variety and growing conditions. The time to regenerate depends on when the mother or central plant starts to die and whether or not the collection is to be ratooned, i.e. suckers are allowed to develop to produce the next crop.
- Ratooning is recommended for dasheen only if the collection is free from major root and leaf diseases. This extends the time between regenerations.
- Ratooning eddoes is possible, but not recommended. Dig up cormels when they are mature and store them in a cool, dry place where they can be checked regularly and replanted when they start to sprout.
Xanthosoma
- Although it is a perennial, it is best to regenerate this crop after 9–12 months when the central or mother plant begins to die down.
- Provided that evaluation for yield or organoleptic qualities is not of concern, the crop can be left in the ground.
- If harvest is delayed for too long, the likelihood of root rots, particularly those caused by Pythium, increases. If there is no threat of root rot the crop can be allowed to ratoon, which doubles the time for regeneration. (See also under Harvesting.)
Cyrtosperma
- Unlike other edible aroids, the time for replanting is flexible.
- Although most varieties mature in 3 years, growing to a height of 3–4 m and with corms of 5–10 kg, the harvest can be delayed.
- Plants can remain in the ground for 10–15 years or longer, even up to 30 years, without deteriorating.
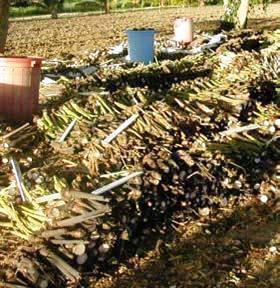 Taro headsets ready for planting on Efate, Vanuatu. (photo: Vincent Lebot/CIRAD) |
Preparation of planting material
Choose healthy planting material. Inspect corms, cormels and headsetts for rots (cause by fungi and/or nematodes) and if found remove with a clean knife or discard the material.
Remove any remaining roots (see photo of preparing planting material). Leave the prepared planting material in a well-ventilated shady place (26–30°C and 90–95% RH) for 3–5 days before planting to allow wounds on the cut surface to heal. Dust corm setts in a fungicide or ash, especially if root rot is known to be a problem in the locality.
Taro
Setts and suckers
- Remove the outer petiole sheaths, especially those that have insect feeding and oviposition punctures (e.g. taro planthoppers, Tarophagus spp.).
- Cut the petioles 30–50 cm above the base and remove the corm, leaving 1–2 cm of corm below the petioles (see photo on the right).
- Small suckers can be planted with the corm intact but check for rots first. If found, discard the plant or remove the rot with a clean knife.
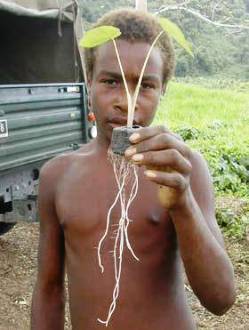 Young taro seedling ready to be transplanted into the field, Efate, Vanuatu. (photo: Vincent Lebot/CIRAD) |
Cormels
- Check and select cormels that have broken dormancy, i.e. the terminal sprout is visible.
- If rots were present in the collection during the previous crop, dust cormels with a fungicide (e.g. thiabendazole, thiram or a copper compound). Remove old roots.
-
Preferably, plant the cormels in a nursery to ensure sprouting and subsequent healthy growth:
- Choose a well-drained site and cultivate the soil to a fine tilth.
- Plant cormels close together (15–20 cm between plants and 15–20 cm between rows).
- Keep the soil moist, no need for fertiliser or shade.
- Label each accession and make a plan of the nursery.
- When plants show uniform growth and one or two new leaves, transfer them to the field (see photo seedling).
Xanthosoma
- Use sections of the central corm (100–150 g) with three or four buds (corm setts) or use cormels.
Cyrtosperma
- Use suckers rather than setts for replanting
- When suckers are limited, use setts; however, setts may not grow as well and take longer to reach maturity than suckers in some countries.
- Cut leaves from the setts or suckers at a downward angle, leaving about 40–50 cm of petiole, with up to 5 cm of the corm, and then place the setts/suckers in a dry shady place for 3–5 days for the wounds to cure before planting.
-
Because there are differences in the choice of planting materials in different countries, consider the following:
- Consult growers as to the most appropriate type of planting material.
- Corms/cormels can also be used as planting material after removal from the mother plant. Plant them in a nursery initially until their root system develops, i.e. 3–4 leaves have emerged, then plant them in the pit or swamp.
- Stop the application of mulch to mother plants 3–4 months before harvest; this will encourage the growth of suckers for regeneration.
Field selection and preparation
Taro
- Plant dryland or upland taro on flat land where there is no waterlogging or, preferably, on hill slopes; plant wetland taro in irrigated fields or swamps.
- Taro can be grown on a variety of soils, but for optimal growth of dryland taro, well-drained clay loams are preferred, with a pH about 5.5–6.5; taro root rot is a risk in waterlogged soils.
- If planting on a slope, avoid planting new collections below those where root rot diseases occurred in the previous crop, as the fungal pathogens spread through ground-water or runoff.
- For dryland and wetland collections, avoid planting taro on land where the crop was planted the previous season; practising crop rotation avoids the build up of pests and diseases.
- For wetland taro, choose sites where water is continuously flowing so that it is cool and rich in dissolved oxygen. Warm, stagnant water results in low oxygen content and can exacerbate corm and root rots. Planting in swamps can be a problem, with build-up of Pythium fungi over time. If unavoidable, it is best to alternate between different swamps or, if others are not available, occasionally grow the collection on dry land and fallow the swamp.
-
Land preparation: Dryland
- Prepare the land by ploughing, disc cultivating and harrowing the soil, cultivating to bury weeds and to obtain a friable soil texture. Deep ripping is recommended if the soil is compacted.
- In the tropics, plant into holes in flat uncultivated (non-tilled) land, so that about one third of the sett is buried. Planting holes should be larger than the size of the corm. Cormels can be planted on flat land, too.
- Alternatively, prepare ridges or furrows for setts or cormels.
- Shallow planting results in corms developing above the soil surface where they may be damaged by insects and rodents. Hence, hilling up will be needed later.
- Shallow planting promotes early sucker development.
- Mounding is also recommended where waterlogging occurs.
-
Land preparation:Wetland
- Plough, disc cultivate and harrow the soil to incorporate crop residues; if possible, keep the land dry for 2–3 months to reduce soil-borne pathogens.
- Puddle the field and then flood it just before or just after planting. The water level should be low at first.
-
In swamps, turn the soil over to bury the weeds before planting. Dig drains around the plots, especially if using the raised bed technique.
Xanthosoma
- Before planting, plough and harrow the soil, or work by mattock or similar tool, then ridge or furrow, depending on prevailing local practice, to facilitate root growth of the corm setts, headsetts or cormels.
- Planting on mounds is an alternative method of cultivation.
- Where land is scarce, and as Xanthosoma is tolerant of shade, plant between mature tree crops, for instance, coconuts or fruit trees. This is not recommended where the collection needs to be characterized and evaluated.
Cyrtosperma
-
Grow Cyrtosperma in pits dug to the fresh water lens or in swamps. If pits are not already there, prepare as follows:
- Dig pits to the water-table, 0.5–3 m deep and as wide as necessary to conserve the collection.
- Add organic matter to form a humus-rich soil or bring in the initial layer from another pit.
- If planting into a swamp, choose sites where there is a more or less continuous supply of slow running water, 20–70 cm deep; avoid swift running water beside streams.
- Choose a site rich in humus or mulch continually.
- Avoid places with a known salinity problem.
- Remove or bury the weeds as they grow in the giant swamp taro patches.
- It is good practice to duplicate the col ection, especial y if it is grown in environments where droughts often occur, as the accessions take many years to reach maturity.
Method of regeneration
Aroids are regenerated using vegetative propagation. Even within clonally propagated species, there may be some level of heterozygosity and it is recommended to plant 5 to 10 plants per accession to maintain the genetic diversity.
Taro varieties differ greatly in their time to maturity. For ease of maintenance and replanting, divide the collection into short-, medium- and long-duration accessions and plant accordingly for ease of management.
Planting layout, density and distance
A number of factors will affect spacing, making it difficult to recommend an optimum spacing or plant density. Plant collections according to the local practice.
Taro
- Wetland taro is usually planted closer together than dryland plantings, suckers closer than mother setts, and cormels closer than setts.
- Where local practice is uncertain, use a spacing of 50 cm between plants and 1 m between rows (20 000 plants per ha) for dryland taro; and 45 cm x 45 cm (50 000 plants per ha) for wetland taro.
- Use a wider spacing if mechanical weeding is carried out or if hil ing up is done by plough.
Xanthosoma
- Where local practice is uncertain, and Xanthosoma is planted on ridges, aim for a spacing of 60 cm between plants in the row and 1 m between rows (16 600 plants per ha) but closer spacings of 60 cm x 80 cm are also used (21 000 plants per ha).
- For mounds, or planting in flat land, use a wider spacing of 90 cm x 90 cm (12 350 plants per ha), 100 cm x 100 cm (10 000 plants per ha) or 100 cm x 150 cm (6600 plants per ha).
Cyrtosperma
- Where local practice is uncertain, aim for a spacing of 50–100 cm between plants in the row and 1 m between rows (10 000–20 000 plants per ha).
- For small accessions, reduce spacing to 50 x 50 cm (40 000 plants per ha).
Planting method
Label each accession with the name, accession number and date planted. Draw a map of the collection immediately after planting. Plant at least 5, preferably 10, plants of each accession in a row. It is best to use long lasting labels (e.g. metal labels and indelible ink).
Taro
- Plant the setts, suckers and cormels vertically, 10–15 cm deep, in ridges, furrows or into flat land as indicated above (see photo below).
Transplanting taro seedlings into the field, Efate, Vanuatu.
(photo: Vincent Lebot/CIRAD)
Xanthosoma
- Plant corm setts, headsetts or cormels about 10–15 cm deep into furrows or mounds. Direct planting into untilled soil is also possible; in this case, loosen soil to a depth of 15–30 cm.
 Mulching of Cyrtosperma with organic material using local practices, Tarawa, Kiribati. (photo: Grahame Jackson) |
Cyrtosperma
Pits
- In pits, fill individual holes of 20–30 cm diameter for each plant with organic material high in nitrogen (e.g. chopped leaves of Pisonia grandis) as manure and cover with sand and mulch (see Fertilization).
- Plant setts or suckers in the sand with their upper roots at water level and firm the plants in place.
- In some countries, each plant is surrounded with a bottomless basket woven in situ from Pandanus or coconut leaves, and filled continually with a mixture of chopped leaves and soil to produce the largest corms (see photo on the right). As it rots and settles, more is added; alternatively a wall of mud is made around each plant into which mulch is added. These practices begin when plants have six or seven leaves.
Swamps
- Alternatively, plant the setts or suckers in a swamp; if the mud is very deep, plant them on ridges to avoid submerging the young plants; add mulch (leaves or coconut husk) as the plants grow.
- Make holes up to 30 cm deep and 20–30 cm wide, depending on the size of the sett or sucker.
- Tie a stick to each plant (sett/sucker) so that, if the water rises, plants are not washed away.
- Ensure that plants are not overshaded after they are 1–2 m high and provide a constant supply of mulch (see Fertilization).
Crop management
Irrigation
Taro and Xanthosoma
Soil needs to be moist at planting. If irrigation is not available, it is important to plant the collection at the beginning of the wet season. If harvesting and replanting can be matched with seasonal rains, irrigation can be minimized.
Cyrtosperma
Irrigation is not necessary as collections are planted in pits near the water-table or in swamps. Choose sites where local knowledge suggests that droughts will have minimal impact and, if possible, duplicate collections in the field.
Fertilization
Perform soil analysis to determine the amount and type of fertilizer needed. Specific fertilizer types and recommended quantities vary widely from place to place and local practice should be followed. In all cases, check the local practice for the crop first.
Taro
- Apply N, P and K in rings, 10 cm from the edge of the planting point after planting. Apply to cormels when shoots have emerged. Apply lime to acid soils.
- Avoid late applications of fertilizer, especially nitrogen, as the eating quality and palatability of the corms can be affected.
- In general, apply fertilizers, compost or manure as a split dose. Apply the first dose at planting, possibly incorporated into the soil during land preparation, and the second dose 3–4 months later, when the corm enlargement is well under way. Split applications minimise the effects of leaching.
- In wetland situations, the nitrogen fixing aquatic fern, Azolla, can be grown.
- Mulch the taro with banana leaves or coconut fronds as per traditional practices.
Xanthosoma
- If grown on land with good soil fertility there is no need for fertilizer but it may be necessary on intensively cropped land.
- Apply split applications of fertilizer at planting and 2, 4 and 6 months after planting, when harvests are at 9–12 months.
- If the crop is to be ratooned, apply fertilizer again at 12 months and continue applications at 2-month intervals.
Cyrtosperma
- Mulching and fertilization are particularly important for Cyrtosperma planted in pits.
- Use leaves for fertilization and mulching. Check local practices for materials to use, how to apply mulch and quantity required. Take care because adding too much leafy material as mulch during planting can be detrimental to the young setts and suckers.
- Apply mulch when the plants have three or four leaves if mulch was not provided at planting; otherwise apply at one month.
- Apply mulch monthly, usually when new leaves emerge, but cease at least 3 months before harvest if taste is being evaluated, as palatability will be compromised.
Weed management
Taro
- Control weeds in wetland, swamp and raised bed situations with mulch (e.g. banana and coconut leaves).
- Control weeds in dryland plantings by hand weeding, herbicides or mechanical cultivation.
- In wetland production it is important to use mulches and/or to keep the paddies covered with a uniform layer of water to at least 2–3 cm, rather than using herbicides.
- Both pre-emergent and post-emergent herbicides are used for weed control in dryland taro; however, if evaluations of the leaves are required for, say, eating quality, then systemic products should not be used.
- Direct herbicide sprays between the rows and use a guard to shield the petioles from damage. Follow local recommendations for herbicide use.
Xanthosoma
- Ensure adequate control of weeds during the initial 6 months, or until leaves form a canopy and weed growth is suppressed; it is especially important during the time of cormel initiation and development, beginning at 2 months.
- Techniques to maintain appropriate weed control: ploughing and harrowing before planting, application of pre- and post-emergent herbicides, hand weeding, putting soil around the base of plants as they grow and mulching.
Cyrtosperma
- Weed regularly until plants form a natural dense canopy, and remove falling trees and branches that might hinder the growth of young plants.
Common pests and diseases
Contact plant health experts to identify pest and disease symptoms and appropriate control measures. Some of the major pests and diseases of aroids are listed below:
Taro
- Diseases: taro leaf blight, Phytophthora colocasiae; alomae and bobone viruses; root and corm rots, Pythium spp.
- Insect pests: delphacid planthopper, Tarophagus spp.; Papuana beetles; Taro hawkmoth caterpillars, Hippotion celerio; cluster caterpillars, podoptera litura.
Xanthosoma
- Diseases: root and corm rot; dasheen mosaic potyvirus (DsMV); southern blight, Athelia rolfsii; Xanthomonas axonopodis pv. dieffenbachiae causes a leaf spot and blight.
Cyrtosperma
- Dasheen mosaic potyvirus (DsMV) is occasionally seen on plants; Papuana beetle is a problem in pits; Radopholus similis, nematode (very restricted distribution on this host); Lasiodiplodia theobromae cause post-harvest rots.
Harvesting
Normally harvesting is not required if the collection is ratooned, as it regrows in the same field (see When to regenerate, above). Take care during harvesting and subsequent handling not to bruise the cormels. Not all the accessions mature at the same time, even when they are categorised according to time to maturity.
Taro
- Maturity for harvest is indicated by a reduction in the height and number of leaves on the mother plant. Whereas suckers of dasheen continue to grow and develop a ratoon crop, leaves of eddoes yellow and die. Although the time to harvest can be extended past the time of maturity, harvesting should not be delayed if the collection is to be evaluated for quality characteristics.
- Harvest collections on dry days to reduce the risk of suckers and cormels becoming infected by pathogens through wounds made when separating them from the parent plant.
- Carry out harvests systematically: choose plants for regeneration; pull them out; cut suckers to size or choose cormels, and label them immediately. Tie suckers in bundles and place cormels in paper bags, or use baskets for both.
- There is no need to harvest all plants of any one accession at the same time unless yield data is being recorded; leave some plants so that if any of the replanted collection dies they can be replaced easily.
Xanthosoma
- Harvest at any time of the year; usually 10–12 months after planting when the leaves have turned yellow and are beginning to dry.
- If the crop is planted into fertile soil, maturity is often extended up to 18 months as vigorous early leaf growth occurs at the expense of cormel development.
- If yield and palatability are not being recorded, the time to harvest can be extended.
- Xanthosoma can be grown as a biennial or perennial crop.
- If needed, annual harvests can be taken without uprooting the entire plant. This ‘cut-and-come-again’ technique can be repeated for up to 6 years.
Cyrtosperma
Harvest when:
- Numerous suckers have formed around the main plant.
- All leaves turn yellowish.
- There is reduced growth after several years.
- Generally, it takes 2–4 years for the crop to fully mature when grown in pits on atolls, and longer (5–8 years) when in swamps on high islands. However, plants can be left beyond this period; the time to maturity depends on variety and soil type.
Post-harvest management
Taro
- Store suckers for 3–5 days in a shady place (see Preparation of planting material, above).
- Store cormels in a well-ventilated place, ensuring that they are protected from damage by pests.
- Treat cormels with care, as they are prone to rots caused by Lasiodiplodia theobromae and Fusarium spp. if damaged.
- Store cormels at 12°C or thereabouts. If properly cured and healthy, they can be stored for several months.
Xanthosoma
- Store cormels for up to 6 months in a well-ventilated cool place; however loss of quality occurs much earlier. Usually, the cormels are stored for 4–8 weeks before they begin to sprout and need replanting. They can also be stored for a few weeks in a pit in the ground, but this is not recommended for collections that require monitoring in case of loss due to rots or other factors.
- Storage time can be extended if cormels are stored at 15°C and 85% RH.
Note that Xanthosoma can be stored in the ground for months or even years after reaching maturity. (See Harvesting.)
Cyrtosperma
- Setts and suckers can be stored for a few days after harvest, kept in a shady place under leaves or sacking to retain high relative humidity, before replanting.
- Corms store for 3–4 weeks.
Monitoring accession identity
- • When plants reach maturity, check that varieties are as originally described using original Bioversity International descriptor lists (IBPGR 1989; IPGRI 1999) and, if available, photographs of the accessions.
- Check for often occurring somatic mutations. These can be added to the collection if they are clearly labelled with a separate accession number and passport data are recorded. Otherwise, discard them.
Documentation of information during regeneration
The following information should be collected during regeneration:
- Regeneration (nursery) site name and map/GPS reference, if used for cormels
- Name of collaborator
- Accession number(s)
- Type of propagating material (e.g. mother, sucker or cormel)
- Nursery planting date
- Survival rate of propagating material (cormels)
- Nursery (if used) management details (media, watering, fertiliser, weeding, others)
- Field site name and map/GPS reference
- Method(s) of planting
- Field conditions (altitude, precipitation, temperature, soil type, slope, others)
- Number of plants established and planting distance
- Field management details: fertiliser, weeding, pest control practices and dates of any treatments, others
- Harvest date(s)
- Any evaluation undertaken at harvest.
References and further reading
Bioversity International. 2009. Key access and utilization descriptors for taro genetic resources. Bioversity International, Rome, Italy. Available here.
Brown D. 2000. Aroids. Plants of the Arum family (2nd ed.). Timber Press, Portland, Oregon, USA. 392 pp.
Clement CR. 1994. Crops of the Amazon and Orinoco regions: Their origin, decline and future. In: Hernaldo JE, León J, editors. Neglected crops: 1492 from a different perspective. Plant Production and Protection Series No. 26. FAO, Rome, Italy. pp. 195–203.
Coursey DC. 1968. The edible aroids. World Crops 20:25–30.
Denham T. 2004. Early agriculture in the highlands of New Guinea: an assessment of Phase 1 at Kuk Swamp. In: Attenbrow V, Fullagar R, editors. A Pacific Odyssey: Archaeology and Anthropology in the Western Pacific. Records of the Australian Museum, Supplement 29. Australian Museum, Sydney, Australia. pp. 47–57.
Edison S, Unnikrishnan M, Vimala B, Pillai SV, Shhela MN, Sreekumari MT, Abraham K. 2006. Biodiversity of tropical tuber crops in India. NBA Scientific Bulletin No. 7. National Biodiversity Authority, Chennai, India. 60 pp.
Giacometti DC, León J. 1994. Tannia. Yautia (Xanthosoma sagittifolium). In: Hernaldo JE, León J, editors. Neglected crops: 1492 from a different perspective. Plant Production and Protection Series No. 26. FAO, Rome, Italy. pp. 253–258.
Hay A. 1988. Cyrtosperma (Araceae) and its Old World allies. Blumea 33:427–469.
Hay A. 1990. Aroids of Papua New Guinea. Christensen Research Institute, PNG.
Hay A. 1998. Botanical varieties in taro, Colocasia esculenta: leaving old baggage behind. A report on taro consultancy No. CO2C. IPGRI, Rome, Italy. 13 pp.
Hernández Bermejo JE, León J, editors. 1994. Neglected crops: 1492 from a different perspective. Plant Production and Protection Series No. 26. FAO, Rome, Italy.
Hetterscheid W. 2004. Genera List (Cyrtosperma). International Aroid Society. Available from: http://www.aroid.org/genera/cyrtosperma/Cyrtospermalist.html. Date accessed: 1 August 2008.
IBPGR. 1989. Descriptors for Xanthosoma. IBPGR, Rome, Italy.
Iese V. 2005. Characterization of the giant swamp taro (Cyrtosperma chamissonis (Merr.) Schott) using morphological features, genetic fingerprinting and traditional knowledge of farmers in the Pacific. MSc Thesis. Biology Department, School of Pure and Applied Sciences, The University of the South Pacific, Suva, Fiji.
IPGRI. 1999. Descriptors for Taro (Colocasia esculenta). IPGRI, Rome, Italy.
Kreike CM, van Eck HJ, Lebot V. 2004. Genetic diversity of taro, Colocasia esculenta (L.) Schott, in Southeast Asia and the Pacific. Theoretical and Applied Genetics 109:761–768.
Lebot V. 1999. Biomolecular evidence for plant domestication in Sahul. Genetic Resources and Crop Evolution 46:619–628.
Matthews PJ. 1991. A possible tropical wildtype taro: Colocasia esculenta var. aquatilis. Indo-Pacific Prehistory Association Bulletin 11:69–81.
Matthews PJ. 2002. Potential of root crops for food and industrial resources. In: Potential of root crops for food and industrial resources. Twelfth Symposium of The International Society for Tropical Root Crops (ISTRC), 10–16 September 2000, Tsukuba, Japan. pp. 524–533.
Matthews PJ. 2002. Taro storage systems. In: Shuji Y, Matthews P, editors. Vegeculture in Eastern Asia and Oceania. JCAS Symposium Series 16. The Japan Center for Area Studies (JCAS), National Museum of Ethnology, Osaka, Japan. pp. 135–163.
Matthews PJ. 2004. Genetic diversity of taro, and the preservation of culinary knowledge. Ethnobotany Research & Applications 2:55–71.
Onokpise OU, Wutoh JG, Ndzana X, Tambong JT, Mekoba MM, Sama AE, Nyochembeng L, Aguegia A, Nzietchueng S, Wilson JG, Burns M. 1999. Evaluation of Macabo cocoyam germplasm in Cameroon. In: Janick J, editor. Perspectives on New Crops and New Uses.
ASHS Press, Alexandria, VA, USA. pp. 394–396.
Onwueme IC. 1978. Colocasia and Xanthosoma (Cocoyams). In: Onwueme IC. The Tropical Tuber Crops: yams, cassava, sweet potato, and cocoyam. J Wiley and Sons Ltd., New York, USA. pp. 589–606.
Onwueme IC, Charles WB. 1994. Cultivation of cocoyam. In: Tropical root and tuber crops. Production, perspectives and future prospects. FAO Plant Production and Protection Paper 126, FAO, Rome, Italy. pp. 139–161.
Plucknett DL. 1976. Edible aroids. In: Simmonds, NW, editor. Evolution of Crop Plants.
Longman Inc, New York, USA. pp. 10–12.
Shaw T. 1976. Early crop in Africa: A review of the evidence. In: Harlan JR, de Wit JMJ, Stemler ABL. Origins of African Plant Domestication. Mouton, The Hague, Netherlands. pp. 108–153.
Thompson S. 1982. Cyrtosperma chamissonis (Aracae): Ecology, distribution, and economic importance in the South Pacific. Journal d’ Agriculture Traditionalelle et de Botanique Applliquee 29(2):185–213.
Wilson JE. 1984. Cocoyam. In: Goldsworthy PR, Fisher NM, editors. The Physiology of Tropical Field Crops. John Wiley and Sons Ltd., New York, USA. pp. 589–605.
Acknowledgements
These guidelines have been peer reviewed by V. Ramanatha Rao, India, and Mary Taylor, Secretariat of the Pacific Community (SPC), Fiji.
Regeneration guidelines for pearl millet
|
View regeneration guidelines in full (in PDF)
Also available in the following languages: |
The information on this page was extracted from:
Upadhyaya H.D., Reddy K.N. and Sastry D.V.S.S.R. 2008. Regeneration guidelines: pearl millet.
In: Dulloo M.E., Thormann I., Jorge M.A. and Hanson J., editors. Crop specific regeneration guidelines [CD-ROM]. CGIAR System-wide Genetic Resource Programme, Rome, Italy. 9 pp.
Before reading the regeneration details for this crop, read the general introduction that gives general guidelines to follow by clicking here.
Introduction
Pearl millet (Pennisetum glaucum (L.) R. Br.), also known as bulrush or cattail millet, is an important grain and forage crop in Africa and South Asia and a forage crop in the Americas. It is mostly grown under hot, dry conditions on infertile soils of low water-holding capacity, where other crops generally fail. Pearl millet belongs to the family Poaceae, subfamily Panicoideae, tribe Paniceae, subtribe Panicinae, section Penicillaria and genus Pennisetum. The genus Pennisetum contains about 140 species. The important wild relatives of cultivated pearl millet include the progenitor, Pennisetum glaucum subsp. monodii Maire; P. purpureum K. Schumach.; P. pedicellatum Trin.; P. orientale Rich.; P. mezianum Leeke; and P. squamulatum Fresen. Previous names are P. typhoideum L.C. Rich. and P. americanum (L.) Leeke. The four cultivated forms of pearl millet are typhoides (found mainly in India and Africa), nnigritarum (dominant in eastern Sahel), globosum (dominant in the western Sahel) and leonis (dominant on the West African coast) (Brunken et al. 1977; Rai et al. 1997; Syngenta 2008).
Pearl millet is a C4 species and grows up to 5 m tall. It is allogamous and landraces are highly heterogeneous. Stigma emergence precedes anther emergence, resulting in high cross-pollination due to wind. Precautions are needed to preclude cross-pollination during regeneration and preserve the genetic integrity of germplasm accessions.
Choice of environment and planting season

Pearl millet growing in the field in Dubai, UAE. |
Climatic conditions
- Pearl millet can grow in a wide range of ecological conditions.
- Low precipitation and relative humidity during seed ripening and maturation are desirable.
- Poor emergence and seedling growth may result if seeds are planted before soil temperatures reach 23°C.
- The optimum annual rainfall is 350–500 mm.
- It can also be grown as an irrigated crop.
Planting season
- Pearl millet is a short-day species and flowers early with short days. Day-length of 12 hours and 28–30°C temperature are suitable for crop growth (Bidinger and Rai 1989).
- Choose time of planting so that flowering and seed development coincide with favourable environmental conditions to facilitate flowering and seed production in all maturity groups.
- If irrigation is available regeneration should be carried out during the off-season (outside the rainy season) when days are short to facilitate flowering and seed production in photosensitive germplasm.
- Under these conditions the incidence of pests and diseases is usually low.
Preparation for regeneration
When to regenerate
- When seed stocks are <50 g.
- When germination falls below 75%.
- When >25% of seeds are infected by one or more fungi, such as Alternaria, Aspergillus, Cladosporium, Curvularia, Fusarium, Macrophomina, Penicillium, Phoma and Rhizopus spp. (Rao and Bramel 2000).
Seed sample
- To maintain genetic integrity use seed from the original source, as far as possible.
- A minimum of 120 plants is required for regeneration.
- A minimum of 9 g seeds is required for regeneration of a germplasm accession.
- Because of small seed size, take care when preparing seed samples.
- Treat the seed with a fungicide to control seed-borne fungi.
- For each accession, prepare one seed packet for planting each row.
- Label the packets with identification number and row number and arrange them according to field lay-out.
Field selection and preparation
- Choose a field that was not under millet during the previous 2 years to reduce risk of volunteer plants and diseases.
- Pearl millet can be grown on a wide variety of soils ranging from clay loams to deep sands but yields and grain quality are best on deep, well-drained productive soils.
- Root development can be severely restricted by soil conditions such as excessively high or low soil moisture levels, hard pan and compaction.
- Pearl millet can tolerate acid subsoils to as low as pH 4 but does not grow well on calcareous soils.
- Cultivate so as to completely bury all crop residues, crop volunteers and weeds.
- Avoid fields infested with witchweed or striga.
- Prepare the land to a fine tilth by deep ploughing fol owed by three or four harrowings.
- Level the field and make ridges 75 cm apart.
Method of regeneration
Pollination
Being mostly allogamous, it is important to properly control cross-pollination by wind and insects to maintain the genetic integrity of individual accessions. Pollination during regeneration can be done in three different ways, namely through cluster bagging, sibbing and selfing. Cluster bagging and sibbing are used for regenerating landraces.
Either method can be used based on the resources and level of genetic integrity which is aimed for. Cluster bagging tends to be more easily implemented and less expensive but has a higher risk of reducing genetic integrity, while sibbing is more labour intensive but can achieve a higher genetic integrity. The sibbing method is followed to maintain male sterile lines (Rao and Bramel 2000). Selfing is principally used to regenerate inbred genetic stocks.
Cluster bagging:
- Cover one panicle each of 2–4 adjacent plants in a row in one parchment paper bag before stigma emergence.
- Staple or put a paper clip holding the corners together so that the bags are not blown off the panicle.
- Pollination occurs among the panicles within the bag.
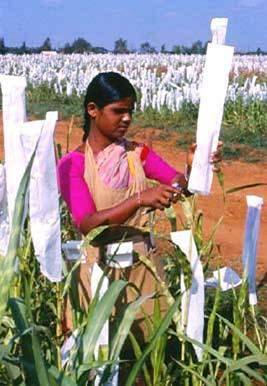
Bagging panicles during pearl millet (Pennisetum glaucum) regeneration. (photo: ICRISAT) |
Sibbing:
- Cover one individual panicle in one parchment paper bag before anthers begin to dehisce. (see photo)
- Staple or put a paper clip holding the corners together so that the bags are not blown off the panicle.
- After 2–3 days, remove the bags and collect pollen from the matured panicles into a common paper bag by gently tapping the panicles into it and then cover the panicles again with their bags.
- When the stigma have emerged, remove the bags from panicles and dust the collected bulked pollen on to the stigmas of all plants in an accession and cover the panicles with paper bags.
- Mark the date of pollination on the bags.
- Continue the process of pollen collection and dusting for 4–5 days in each accession, depending on panicle length and flowering duration.
- Self the plants that flower very early by covering the panicles in parchment paper bags. If the plants flower very late, pol inate them with pol en col ected from tillers of the early flowering plants. If no til ers are available, self the late- flowering plants too.
- Ensure that all plants within the accession are either sibbed or selfed.
- Remove the bags 2 weeks after flowering (at dough stage) and clasp them around the panicles to identify selfed/sibbed panicles when harvesting (Rao and Bramel 2000).
Selfing:
- Cover individual panicles in parchment paper bags before stigma emergence and staple the bags (see photo).
- Mark the date of covering on the bag.
Planting layout, density and distance
- Divide the field into plots (also known as tiers), with 1 m between them. The plots should be at least 4 m wide, depending on the size of the field.
- Mark rows 75 cm apart across each tier, perpendicular to the length of the field, giving rows of at least 4 m long or more, depending on the width of the plot.
- Assign row numbers in a serpentine pattern (i.e. planting from left to right in the first row followed by right to left in the second row or vice versa).
Planting method
- Plant using a tractor- mounted four-cone planter or sow manually.
- Plant on top of ridges to facilitate good drainage, easy field operations and high soil moisture availability.
Labelling
- Label each accession with a tag fastened to a stake about knee height.
- The tags should be of strong paper to withstand weathering.
Crop management
Weed management
- Spray a pre-emergent herbicide at recommended dose to minimize weeds (Andrews et al. 1993).
- Inter-cultivate 15–20 days and 30–35 days after sowing and put earth around the base of plants after 35–40 days to minimize lodging.
- Depending on number of weeds, hand weed once or twice.
- Weed control is critical around 25–30 days after sowing.
Thinning
- Thin the crop after 15 days to about 120 plants in 1–3 rows.
- Thin again when seedlings are 2–3 weeks old, leaving 10 cm spacing between the plants and a minimum of 40 plants in each row/plot.
Fertilization
- If possible, do a soil test to determine fertilizer needs and apply fertilizer according to recommendation.
- If it is available, apply 6–7.5 t of farmyard manure/ha and incorporate it before last ploughing.
- Apply a basal dose of diammonium phosphate (150 kg/ha) and urea (100 kg/ha) as top dressing 30 days after sowing.
Irrigation
- Apply supplemental irrigation after sowing if the soil is not moist enough; irrigate again if leaves wilt at any stage of crop growth and to ensure enough moisture in the soil at flowering.
- See that the field has proper drainage, as waterlogging damages the crop severely.
Common pests and diseases
Arrange for pathologists and entomologists to visit the field to identify pests and diseases and their control. Major pests and diseases of pearl millet include:
- Downy mildew (Sclerospora graminicola (Sacc.) J. Schröt): chlorosis of plant parts, stunted growth and development of green ears are the main symptoms.
- Smut (Moeszimyces penicillariae (Bref.) Vanky): soil-borne pathogen infects crop at flowering through the stigmas, resulting in large brown sori in place of seeds.
- Ergot (Claviceps fusiformis Loveless): soil-borne pathogen infects crop at flowering through the stigmas, resulting in hard, dark brown to black structures, larger than seed, which protrude from florets in place of grain.
- Rust (Puccinia pennisiti): leaf tissues become necrotic from the distal to the basal parts of the leaf. Infected leaf tissue develops circular hypertrophied lesions, yellow-green in colour with a distinct orange border.
- Head caterpillar (Heliothis albipunctella De Joannis): feeds on panicles causing considerable yield loss.
Pest and disease control
- Seed treatment
- Spray recommended fungicide/insecticide if available
- Cultural practices
- Crop rotation
Harvesting
- Harvest 5–6 weeks after bagging, depending how long the accession takes to reach maturity.
- Determine physiological maturity by a black (dark) spot at the bottom of the grain.
- When the crop matures, the leaves turn yellow and dry, grain is hard and firm.
- Cut the bagged or selfed panicles just below the base — one from each plant, from at least 120 plants per accession.
- Collect the panicles within the plot (accession) into a gunny bag labelled inside and out with tear-off tags.
- Do not harvest diseased plants.
Post-harvest management
- Dry the panicles in shade for a week until the seed moisture content is reduced to 12%.
- Thresh individual panicles by gently beating with sticks and clean the seeds by winnowing.
- Collect equal quantity of seeds from each plant to reconstitute the accession.
- Prevent seed mixtures during threshing and seed handling.
- Collect the seeds in a labelled muslin cloth bag for further drying, preferably at a lower temperature and relative humidity.
- Avoid chemical treatment of seed intended for storage.
- Send representative seed samples for seed health and viability testing.
- Reject seed samples with high percentage (>25%) of infection by seed-borne fungi and less than 75% viability. List such accessions for regeneration in the next season.
- Dry seeds to 8–9% moisture content for medium-term conservation.
- For long-term conservation, dry the seeds to 5–7% moisture content using forced ventilation at 15°C and 15–20% relative humidity (Rao and Bramel 2000).
- If a drying room and forced ventilation facilities are not available, dry seeds to a moisture content of 5–7% with silica gel or another appropriate desiccant.
- Verify the accession identity by comparing seed traits with reference material.
- Pack seeds in moisture impermeable containers for conservation and distribution.
Monitoring accession identity
- Eliminate off-types and plants growing off-row.
- Compare for following traits in characterization data: panicle shape, grain shape, grain colour
- Rogue the plants which are genuine mixtures.
Regeneration of wild species
- Maintain wild species as living plants in properly controlled environments to avoid possible outcrossing of germplasm with related species and the introduction of new weedy species.
- Prepare broad beds 1.5 m wide and 6 m long.
- Germinate the wild species in paper cups and transplant them in the evening, 20 cm apart.
- Cover the panicles in parchment paper bags before stigma emergence to prevent outcrossing and seed loss due to shattering.
- Harvest panicles individually, 5–6 weeks after anthesis.
- Separate the seeds by crushing the florets between hands.
- Clean the seeds and take equal quantities of seed from each plant to reconstitute the accession.
- Prune perennial and rhizomatous species up to 30 cm from ground level during the rainy season to avoid mixing with adjacent accessions.
- Use a sample size of 8–10 plants per accession (Rao and Bramel 2000).
Documentation of information during regeneration
The following information should be collected during regeneration:
- Regeneration site name and map/GPS reference
- Name of collaborator
- Field/plot/nursery/greenhouse reference
- Accession number; population identification
- Source of seed
- Generation or previous multiplication or regeneration (if generation is not known)
- Preparation of planting materials (pre-treatments)
- Sowing date and density
- Field layout used
- Field management details (watering, fertilizer, weeding, pest and disease control, stresses recorded, others)
- Environmental conditions (altitude, precipitation, soil type, others)
- Emergence in the field or greenhouse (number of plants germinated)
- Number of plants established
- Days from sowing to flowering
- Breeding system
- Pollination control method used (method, number of plants pollinated)
- Harvest date and method
- Number of plants harvested
- Quantity of seeds harvested
- Morpho-agronomic traits recorded
- Comparisons with reference materials (record any identification numbers or references of any samples taken from this regeneration plot)
- Post-harvest (describe any relevant procedures).
References and further reading
Andrews DJ, Rajewski JF, Kumar KA. 1993. Pearl millet: New feed grain crop. In: Janick J, Simon JE, editors. New Crops. John Wiley & Sons, Inc, New York, USA. pp. 198–208. Available from: http://www.hort.purdue.edu/newcrop/proceedings1993/v2-198.html. Date accessed: 3 October 2008.
Bidinger FR, Rai KN. 1989. Photoperiodic response of paternal lines and F1 hybrids in pearl millet. Indian Journal of Genetics and Plant Breeding 49:257–264.
Bioversity International, ICRISAT, USDA-NPGS, AICR. 2010. Key access and utilization descriptors for pearl millet genetic resources. Bioversity International, Rome, Italy; International Crops Research Institute for the Semi-Arid Tropics, India; United States Department of Agriculture National Plant Germplasm System, USA; All India Coordinated Research Project on Pearl Millet, India. Available here.
Brunken JN, de Wet JMJ, Harlan JR. 1977. The morphology and domestication of pearl millet. Economic Botany 31:163–174.
Rai KN, Appa Rao S, Reddy KN. 1997. Pearl millet. In: Fuccillo D, Sears L, Stapleton P, editors. Biodiversity in Trust. Conservation and use of plant genetic Resources in CGIAR Centers. Cambridge University Press, Cambridge, UK. pp. 243–258.
Rao NK, Bramel PJ. 2000. Manual of genebank operations and procedures. Technical Manual no. 6. ICRISAT, Patancheru, India.
Syngenta. 2008. What is pearl millet? Available from: http://www.syngentafoundation.org/index.cfm?pageID=193. Date accessed 3 October 2008.
Acknowledgement
These guidelines have been peer reviewed by Kameswara Rao, International Center for Biosaline Agriculture (ICBA), Dubai, UAE.
Regeneration guidelines for pigeonpea
|
View regeneration guidelines in full (in PDF) Also available in the following languages: |
The information on this page was extracted from:
Upadhyaya H.D., Reddy K.N. and Sastry D.V.S.S.R. 2008. Regeneration guidelines: pigeon pea.
In: Dulloo M.E., Thormann I., Jorge M.A. and Hanson J., editors. Crop specific regeneration guidelines [CD-ROM]. CGIAR System-wide Genetic Resource Programme, Rome, Italy. 9 pp.
Before reading the regeneration details for this crop, read the general introduction that gives general guidelines to follow by clicking here.
Introduction
Pigeonpea (Cajanus cajan (L.) Millsp., syn. Cajanus indicus) is a member of the Fabaceae family and has many wild relatives. These include Cajanus scarabaeoides (L.) Thouars, C. sericeus (Benth. ex Baker) Maesen, C. acutifolius (F. Muell.) Maesen, C. albicans (Wight & Arn.) Maesen, Rhynchosia aurea, R. bracteata Benth. ex Bak and Flemingia bracteata (Roxb.) Wight (van der Maesen 1985). The pigeonpea plant is an erect annual or short-lived perennial reaching a height of 1–3 m. Because the coarse bush is deeply rooted, it has wide adaptability and grows well in semi-arid areas. It has slender, pointed trifoliate leaves and yellow or yellow and red flowers. Pods are green and pointed with some reddish mottling. Several pods are produced in clusters on an upright stem.
Pigeonpea is often cross-pollinated by bees (Megachile spp.). Cross-pollination ranges from 0–40% depending on genotype and insect pollinator populations (van der Maesen 1985). Consequently, precautions are needed during regeneration to preclude cross-pollination and preserve the genetic integrity of germplasm accessions.
Choice of environment and planting season
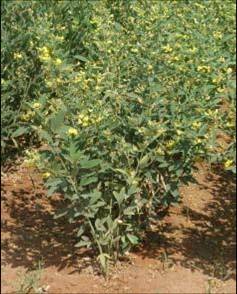
Pigeonpea growing in the field. |
Climatic conditions
- Pigeonpea can be grown in a wide range of climates.
- Geographical areas with low precipitation and low relative humidity during seed ripening and maturation favour crop growth.
Planting season
- Pigeonpea is a short-day species which flowers early with short days. Day length of 11–11.5 hours (Gooding 1962) and a temperature range of 22–30°C (Whiteman et al.1985) are suitable for crop growth.
Preparation for regeneration
Time to regenerate
- When seed stocks are <50 g.
- When germination drops to below 75%.
- When more than 25% of seeds are infected by one or more fungi, such as Alternaria, Aspergillus, Cladosporium, Curvularia, Fusarium, Macrophomina, Penicillium, Phoma and Rhizopus spp. (Rao and Bramel 2000).
Seed sample
- To maintain genetic integrity, use a seed sample from the original source whenever possible.
- The minimum number of plants required for regeneration is 180.
- About 23 g of seed are required to regenerate an accession.
- Treat the seed with an effective fungicide to control seed-borne fungi.
- For each accession, prepare one seed packet for planting each row.
- Label the packets with identification number and row number and arrange them according to field lay-out.
Field selection and preparation
- Choose a field that has not been under pigeonpea for the previous 2 years to reduce disease risk.
- Pigeonpea grows best on Alfisols (red soils) or Vertisols (black soils).
- Pigeonpea is susceptible to waterlogging, salinity and soil acidity. Choose fields with good drainage, low salinity and a pH between 5 and 8.5.
- Prepare the land to a fine tilth by ploughing to a depth of 15–20 cm twice, followed by harrowing two or three times.
- Make ridges 75 cm apart on a levelled field.
Method of regeneration
Pollination control
- Cross-pollination due to bees (Megachile spp.) needs to be prevented to maintain the genetic integrity of accessions.
- Cover plants with muslin bags or grow accessions in insect-proof cages to avoid cross-pollination. The latter may be a more economical way (Reddy et al. 2006).
Planting layout, density and distance
- Divide the field into plots (also known as tiers), with a 1-m walkway between them. The size of the plots can vary from 3 to 9 m wide depending on the size of the field.
- Mark rows 75 cm apart across each tier, perpendicular to the length of the field, giving rows of 3 to 9 m in length, depending on the width of the plot.
- Assign row numbers in a serpentine pattern (i.e. planting from left to right in the first row followed by right to left in the second row or vice versa).
Planting method
- Plant on top of the ridges to facilitate good drainage, easy field operations and high soil moisture availability.
- Plant seed on ridges with a 25 cm spacing between ridges.
- Dibble two or three seeds manually to 4–5 cm depth per ridge.
Labelling
- Label each accession with a tag fastened to a stake about 1 m high.
- Use strong paper for tags to withstand weathering.
Crop management
Weed management
- Apply pre-emergent herbicide to control weeds.
- Inter-cultivate 20–25 days and 45–50 days after sowing to reduce the cost of manual weeding.
- Weed manually two or three times, depending on the number of weeds.
- Weed control is critical 30–40 days after sowing.
Irrigation
- Irrigate after sowing if necessary.
- Ensure adequate soil moisture at flowering.
Fertilization
- If possible, carry out a soil test to determine fertilizer needs.
- Apply fertilizers and farmyard manure according to recommendations.
- Generally, apply a basal dose of diammonium phosphate at 100 kg/ha.
Thinning
- Thin seedlings to two plants per hill, 15 days after sowing, leaving a total of 180 plants per accession.
Common pests and diseases
Contact plant health experts to identify pests and diseases and appropriate control measures. Some of the major pests and diseases of pigeonpea are:
- Wilt (Fusarium udum): causes loss of turgidity in leaves, slight chlorosis and browning of xylem vessels from root system to the stem.
- Sterility mosaic disease, caused by virus transmitted by mites: diseased plant becomes pale green and bushy without flowers and pods.
- Pod borer (Helicoverpa armigera), pod fly (Melanagromyza obtusa) and Maruca (Maruca testulalis): feed on flowers, pods and seeds and cause huge crop losses.
Pest and disease control
- Control soil-borne diseases through solarization of soil, by covering the field with a polyethylene sheet and practising crop rotation (Rao and Bramel 2000).
- Spray an appropriate acaricide two or three times to control sterility mosaic disease.
- Application of suitable insecticides and fungicides can control pigeonpea pests and diseases.
Harvesting
- Harvest when pods are dry, which can be judged by a rattling sound when pods are shaken.
- Harvest pods from each plant separately.
- Clearly label bags/packets.
- Keep the bags of a plot (accession) together inside a labelled jute sack for drying.
- Do not harvest diseased plants.
Post-harvest management
- Thresh the pods after drying for 2–3 days (to about 12% moisture) under shade by gentle beating with wooden mallets.
- Avoid spillover and seed mixing during threshing.
- If limited numbers of pods are available, separate seeds manually.
- Clean the seeds of debris by winnowing.
- Collect equal quantities of seed from each plant in a labelled muslin cloth bag to reconstitute the accession for further drying, preferably at a lower temperature and relative humidity.
- Verify the accession identity using seed traits.
- Send a representative sample of seed for seed health and initial viability testing.
- Reject seed samples that have high infection of seed-borne fungi (>25%) or seed viability less than 75%; regenerate such accessions again in the following season.
- Dry the seeds to 8–9% moisture content for medium-term conservation.
- For long-term conservation, dry the seeds to 5–7% moisture content using forced ventilation at 15°C and 15–20% relative humidity.
- If a drying room and forced ventilation facilities are not available, dry seeds to a moisture content of 5–7% with silica gel or other suitable desiccant.
- Pack seeds in impermeable containers (plastic bottles, aluminium containers, aluminium foil packets) for conservation and distribution.
- Avoid chemical treatment of seed intended for storage.
Regeneration of wild pigeonpea
Raising seedlings
- Fill small plastic/paper cups or small pots (10 x 10 cm with a hole in the bottom) with a pasteurized mixture of 3 parts soil to 1 part farmyard manure.
- Scarify the seeds by making a small cut in the seed coat to improve water absorption and germination.
- Dress the seeds with fungicide to control seed-borne diseases.
- Put two to four seeds in each pot at about 3 cm depth.
- Water the pots every day using watering cans (Rao and Bramel 2000).
Transplanting
- Use large pots (30 x 30 cm) filled with a pasteurized mixture of soil and farmyard manure (3:1) for creeping herbs such as C. platycarpus, C. scarabaeoides and Rhyncosia species. Plant out perennial shrubs and creepers such as C. albicans, C. crassus, C. goensis, C. heynei and C. mollis in a field genebank.
- Transplant seedlings when they have three or four leaves or are 2–5 cm tall.
- Transplant the seedling to the appropriate pot or field in the evening and water it.
- Keep the new pots in shade for 2 days, keeping the soil moist.
- If transplanted to the field, plant in rows 4 m long with a spacing of at least 25 cm between plants and arrange shade for 2 days.
- Use a minimum sample size of 8 to 10 plants for each accession.
- Provide bamboo stakes to support climbers such as C. albicans, C. crassus, C. goensis, C. heynei and C. mollis (Rao and Bramel 2000).
All other procedures are the same as those for cultivated pigeonpea.
Monitoring accession identity
Compare for following traits in characterization data:
- Growth habit
- Flowering pattern
- Flower colour
- Primary seed colour
- Verify the accession identity and rogue plants that are genuine mixtures.
Documentation of information during regeneration
The following information should be collected during regeneration:
- Regeneration site name and map/GPS reference
- Name of collaborator
- Field/plot/nursery/greenhouse reference
- Accession number and population identification
- Source of seed
- Generation or previous multiplication or regeneration
- Preparation of planting materials (pre-treatments)
- Sowing date and density
- Field layout used
- Field management details (watering, fertilizer, weeding, pest and disease control, stresses recorded, others)
- Environmental conditions (altitude, precipitation, soil type, others)
- Emergence in the field or greenhouse (number of plants germinated)
- Number of plants established
- Days from sowing to flowering
- Breeding system
- Pollination control method used (method, number of plants pollinated)
- Harvest date and method
- Number of plants harvested
- Quantity of seeds harvested
- Agronomic evaluation; agro-morphological traits recorded
- Comparisons with reference materials (record any identification numbers or references of any samples taken from this regeneration plot)
- Post-harvest (describe any relevant procedures) (Rao and Bramel 2000).
References and further reading
Bioversity International, ICRISAT, ICAR. 2010. Key access and utilization descriptors for pigeonpea genetic resources. Bioversity International, Rome, Italy; International Crops Research Institute for the Semi-Arid Tropics, India; Indian Council of Agricultural Research, India. Available here.
Gooding HJ. 1962. The agronomic aspects of pigeonpeas. Field Crops Abstracts 15:1–5.
Rao NK, Bramel PJ. 2000. Manual of genebank operations and procedures. Technical Manual no. 6. ICRISAT, Patancheru, India.
Reddy KN, Upadhyaya HD, Reddy LJ, Gowda CLL. 2006. Evaluation of pollination control methods for pigeonpea (Cajanus cajan (L.) Millsp.) germplasm regeneration. International Chickpea and Pigeonpea Newsletter 13:35–38.
van der Maesen LJG. 1985. Cajanus DC and Atylosia W.& A. (Leguminosae). Agricultural University Wageningen Papers 85-4, 1985. Agricultural University, Wageningen, the Netherlands. 225 pp.
Whiteman PC, Byth DE, Wallis ES. 1985. Pigeonpea (Cajanus cajan (L.) Millsp.). In: Summerfield RJ, Roberts EH, editors. Grain Legume Crops. Collins Professional and Technical Books, London, UK. pp. 685–698.
Acknowledgement
These guidelines have been peer reviewed by Kameswara Rao, International Center for Biosaline Agriculture (ICBA), Dubai, UAE.
More Articles...
Subcategories
-
main
- Article Count:
- 17


